REVIEW · SAN FRANCISCO
Early Bird San Francisco GoCar Tour
Book on Viator →Operated by GoCar Rentals, Inc. · Bookable on Viator
Beat the morning traffic with a GoCar. The Early Bird San Francisco GoCar tour is built for early risers: you get a GPS touring car for up to 3 hours before noon, then you drive the route at your own speed.
I also like that it starts with real support, not just a rental code. You get an orientation plus helmet and map so you can focus on San Francisco, not guessing where to go.
One thing to consider: this is self-driven and GPS-based, so if navigation hiccups you’ll need to problem-solve quickly and still be mindful of getting back on time.
In This Review
- Key things that make this GoCar tour worth your time
- An early bird GoCar that saves your day (and your parking time)
- What you’re really paying for: $169 per GoCar (up to 2)
- The GoCar vehicle: small, motorcycle-like controls, and easy to manage
- Your “self-paced” plan: how to use the 2–3 hours well
- Stop-by-stop: what each landmark is good for (and what to watch out for)
- Ghirardelli Chocolate Factory area: a classic SF starting point
- Radhaus German Restaurant area: views of the Bay
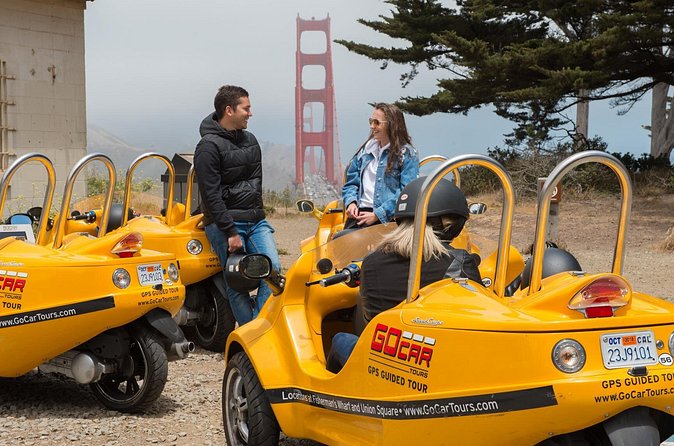
- Fort Point at the foot of the Golden Gate Bridge: the best bridge option you can drive to
- Golden Gate Bridge entrance photo time: quick, cinematic, and don’t try to cross
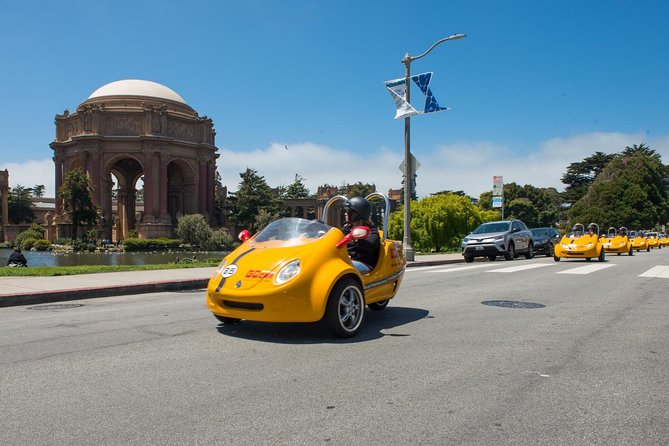
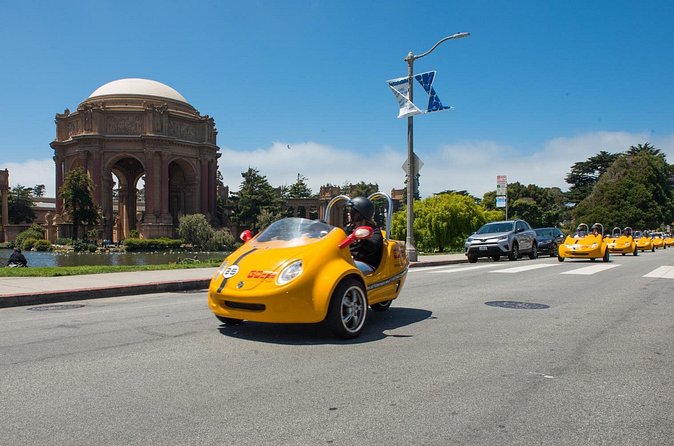
- Palace of Fine Arts: a short stop that pays off for photographers
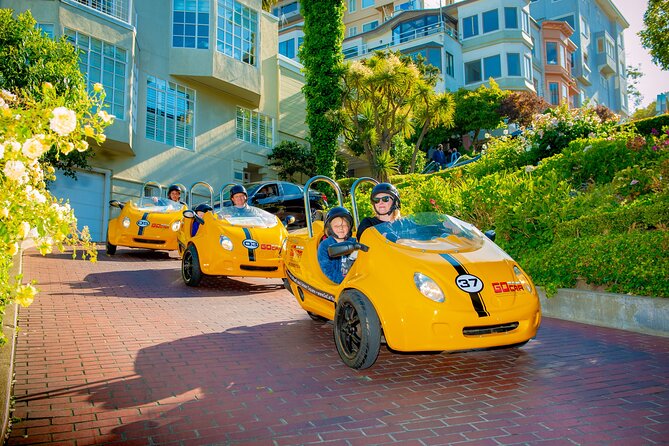
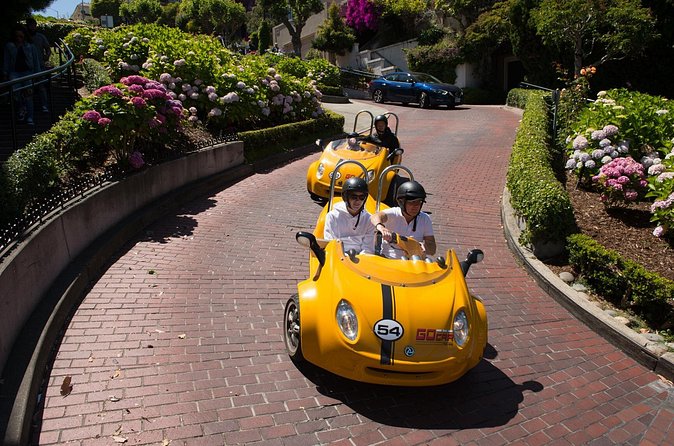
- Lombard Street: the hair-raising payoff
- Driving rules and safety details that matter in real life
- Tips to get the most from the GPS car while staying relaxed
- Who this GoCar tour is best for (and who might want something else)
- Should you book the Early Bird San Francisco GoCar tour?
- FAQ
- Where do I start and end the Early Bird San Francisco GoCar tour?
- How many people can fit in a GoCar?
- Can you cross the Golden Gate Bridge in the GoCar?
- What’s included in the price?
- What are the age and document requirements for driving?
- What’s the cancellation/refund rule?
Key things that make this GoCar tour worth your time
- Up to 3 hours before noon for a classic SF “early bird” window
- Helmet, map, and rider orientation so you start confident
- Golden Gate photo time at the entrance plus a Fort Point route (no bridge driving)
- Lombard Street on the Crookedest Street with a hair-raising feel
- 2-person GoCar with free-ranging stops you control
- Small 3-wheeled vehicle that’s easier to park in San Francisco
An early bird GoCar that saves your day (and your parking time)
San Francisco is a city where timing matters. If you want the Golden Gate and Lombard Street without spending half the day stuck in traffic or searching for parking, this tour’s before-noon rental window is the whole point. You start at 431 Beach St and end back there, which keeps the plan simple even when you take detours.
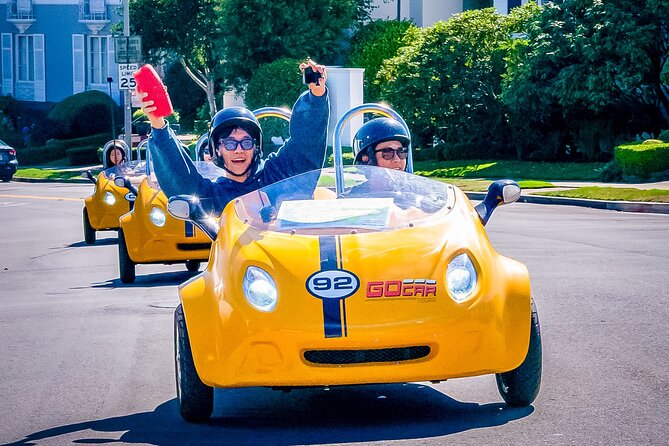
The vehicle itself helps too. The GoCar is a small, 3-wheeled, two-seat ride with a lockable trunk for your stuff. In a city where “just park over there” is often wishful thinking, the smaller footprint is a practical advantage you’ll feel right away.
You can also read our reviews of more tours and experiences in San Francisco.


What you’re really paying for: $169 per GoCar (up to 2)

At $169 per group (up to 2), the pricing works best when you split the cost with one other adult. The GoCar is priced per car, not per person, so two people can turn this into one of the more cost-friendly ways to cover multiple landmarks.
You also get more than a steering wheel and a route. The included package covers:
- up to 3 hours of touring
- tank of gas
- helmet and a map
- rider orientation and instructions
- an 8.75% environmental fee for carbon offset plus gasoline and tire recycling
One practical note: there’s also an optional Collision Damage Waiver (CDW) for $19. If you skip it, the security deposit is larger; if you buy it, the deposit drops. This isn’t “cheap insurance,” but it’s worth understanding so you’re not surprised by the hold on your credit card.
The GoCar vehicle: small, motorcycle-like controls, and easy to manage
This is a motorcycle-style setup: handle and throttle, plus hand brakes. The good part is that it’s designed to be intuitive for people who can handle a simple driving interface. The two-seat layout is roomy enough for short drives and scenic stops, and the lockable trunk means you don’t have to carry backpacks everywhere.
It’s also built with San Francisco realities in mind:
- Up to 35 mph, but most areas on the route are residential or in parks, so expect around 30 mph or less
- Max height 6’4″ (1.9 m) and max combined weight 500 lbs (226.8 kg) for two passengers
- No hotel pickup/drop-off, so you’ll start at the meeting point and end there
The car is registered as a motorcycle, but you do not need a motorcycle license to operate it. You will, however, need to have the right driver documents in hand at check-in, including a valid license and a major credit card.
Your “self-paced” plan: how to use the 2–3 hours well
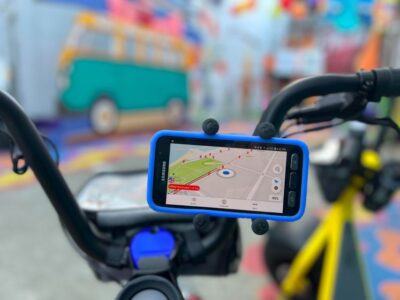
This is not a hop-on, hop-off bus. You’re in control. The tour is GPS-guided, and you can set your own pace—plus you can stop along the way.
That freedom is the strength, but it comes with a reality check: you have a limited rental window (listed as about 2 to 3 hours). If you use the time for extra detours or linger too long at one photo stop, the last portion can feel tight. In the same way that a great brunch can run late, the tour can feel rushed at the end if you don’t pace yourself.
A simple strategy:
- Start with landmarks that take the least time to enjoy (quick photo stops, scenic pull-offs)
- Use Lombard Street as your “big payoff” stop
- Keep an eye on time so you’re not racing back to the meeting point
The tour also notes several fun detours are included. That means you might see even more than just the headline sites—if you stay on the route and follow the plan the car suggests.
Stop-by-stop: what each landmark is good for (and what to watch out for)


Ghirardelli Chocolate Factory area: a classic SF starting point
Early on, you’ll pass the site of the world-famous Former Ghiradelli Chocolate Factory. This stop is less about a long visit and more about context. You’ll get the sense of San Francisco’s old-school waterfront energy without committing a huge chunk of time.
If you’re the type who likes seeing the “icon” first and then exploring later, starting here works. If you want a museum-style stop with lots of walking, this tour probably isn’t your best fit.
Radhaus German Restaurant area: views of the Bay
Next you’ll get to the Center for Arts and Radhaus German Restaurant area, where the Bay views come into play. This is a good segment for photos because you’re elevated enough to frame skyline-and-water shots, and you’re not fighting crowds in a long queue.
Drawback: this segment is still a quick stop. You’ll want to be ready to take photos fast and move on.
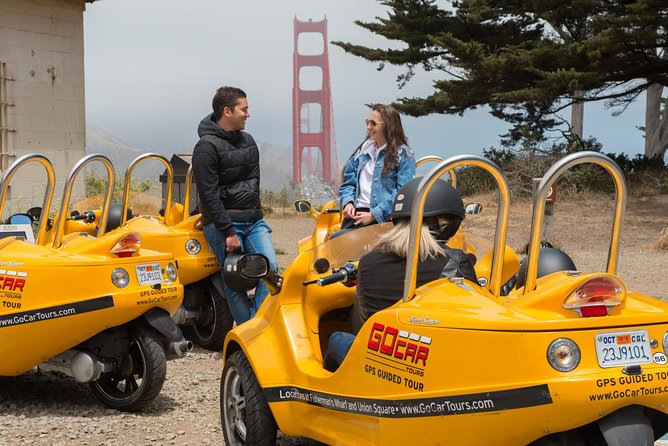
Fort Point at the foot of the Golden Gate Bridge: the best bridge option you can drive to
You can’t cross the Golden Gate Bridge in this tour. Instead, it steers you toward the fort built at the foot of the bridge—Fort Point. This is one of the most useful tradeoffs in the whole itinerary: you still get the dramatic bridge overhead look, and you do it in a way that avoids the bigger friction of crossing.
The good news is that there’s a bridge vantage point and, from the car park there, pedestrian access to the bridge span is possible. So even though you can’t drive across, you may still be able to step out and grab a different angle on the bridge itself (time permitting and depending on access conditions).
Golden Gate Bridge entrance photo time: quick, cinematic, and don’t try to cross
You’ll also have a short stop specifically for the Golden Gate Bridge—listed as about 20 minutes with free admission. This is the “wow” moment in most people’s minds: you pull up, take pictures right near the entrance, and let the scale hit you.
Important: the tour explicitly says not to try and cross the bridge in the car. You’ll be navigating for viewing and positioning, not doing the full crossing drive.
Palace of Fine Arts: a short stop that pays off for photographers
Then comes the Palace of Fine Arts Theatre area, a classic photo stop with about 10 minutes and free admission. This segment is ideal if you want a change of scenery from the bridge and the street drama—something calmer and more architectural.
Because the stop is brief, go in ready. Grab wide shots first, then close details if you have time.
Lombard Street: the hair-raising payoff
Finally, Lombard Street—the crookedest-street moment—gets about 30 minutes. This is where the tour tends to feel most like an experience and less like sightseeing-by-driving. You’ll get that “tight turns, steep slopes” sensation that makes Lombard so famous.
If you’re prone to motion discomfort, this might be the stop where you’ll appreciate going slowly and staying seated comfortably. If you’re a photo person, plan to shoot quickly and then enjoy the ride.
Driving rules and safety details that matter in real life
Before you head out, read the practical restrictions carefully. They’re there for safety and for making the experience smooth.
- Driver must be 21+, with a major credit card and a valid driver’s license physically in hand at check-in
- Passengers must be 4 years or older and small children must fit safely into one of the DOT-approved helmets
- The GoCar max height is 6’4″, and max combined weight is 500 lbs for two passengers
- Speed is limited; you should expect city speeds more than highway speeds
Also, because the vehicle is GPS-guided, navigation problems can happen. If you lose signal or the route doesn’t behave as expected, don’t panic—slow down, use available tools, and focus on getting back on track in time. In one real-world situation, people reported a navigation system issue close to the return window, which is why it’s smart to stay alert and keep extra margin in your schedule.
Tips to get the most from the GPS car while staying relaxed
The best part of this tour is also the part that can stress you: you’re not being walked around by a guide. You’re driving and following the car’s plan.
Here’s how you keep it fun:
- Plan for a 2-hour mindset and a 3-hour buffer. If you want the full experience, don’t treat the time as guaranteed.
- Stay on the route if you’re not confident with San Francisco navigation. The tour notes several fun detours are included, but they’re meant to work within the designed plan.
- Use your photos as a “grab and go” rhythm. Quick bursts, then move.
- Bring a little flexibility. This tour works best when you’re okay adjusting your stop order if the car suggests a different path.
One more practical point: parking. The GoCar is small, so you should find street-level parking easier than you would with larger rental cars. Still, crowded viewpoints at peak times can slow you down, so your early start helps.
Who this GoCar tour is best for (and who might want something else)
This Early Bird GoCar tour is a strong match if you:
- want freedom without planning every turn yourself
- like landmark clusters (bridge area, a museum-like stop, and Lombard Street)
- enjoy driving and don’t mind handling navigation on the fly
- travel as a pair and can split the per GoCar price
It’s less ideal if you:
- want long guided explanations at each stop
- dislike GPS-based routing or you get anxious when tech acts up
- need hotel pickup or a fully escorted experience (this tour starts and ends at the meeting point)
It also suits families in a practical way because kids can ride with the right helmet fit, but you’ll still be responsible for driving decisions and timing.
Should you book the Early Bird San Francisco GoCar tour?
Book it if you want a classic SF route with real driving freedom, starting early enough to avoid the worst of the day. The combination of helmet + map + orientation, the efficient cluster of stops, and the small-car practicality makes this a smart value when you’re splitting the GoCar cost with another person.
Skip it or consider another format if you strongly prefer a guide-led tour with deep explanations at each landmark, or if you know you’ll struggle with navigation if the GPS acts strangely. In that case, the stress risk outweighs the freedom.
If you do go, my best advice is simple: leave some time for Fort Point and Lombard Street, keep moving between stops, and treat the rental window like a friendly deadline, not a suggestion.
FAQ
Where do I start and end the Early Bird San Francisco GoCar tour?
The tour starts at 431 Beach St, San Francisco, CA 94133, USA, and it ends back at the same meeting point.
How many people can fit in a GoCar?
GoCars hold a maximum of 2 people, and prices are per GoCar (not per person).
Can you cross the Golden Gate Bridge in the GoCar?
No. The tour navigates you to Fort Point at the foot of the Golden Gate Bridge. You can have pedestrian access to the bridge span from the car park at the bridge vantage point, if access is available.
What’s included in the price?
Included are up to three hours of touring, a tank of gas, rider orientation, helmets, a map, and an 8.75% environmental fee for carbon offset plus gasoline and tire recycling.
What are the age and document requirements for driving?
The driver must be 21 or older and must have a major credit card and a valid driver’s license in physical possession at check-in (no photocopies). Passengers must be 4 or older and fit safely into one of the DOT-approved helmets if they are small children.
What’s the cancellation/refund rule?
Free cancellation is available. You must cancel at least 24 hours before the experience start time for a full refund; changes within 24 hours aren’t accepted, and there is no refund if you cancel less than 24 hours before start time.