REVIEW · SAN FRANCISCO
Express San Francisco Layover Tour w Airport Pickup and Dropoff
Book on Viator →Operated by Carefree Charters · Bookable on Viator
Three hours can turn into real sightseeing in San Francisco. This Express layover tour is built for tight connections, with SFO airport pickup and dropoff plus planned stops you can enjoy without wrestling with transit.
I especially like the balance of short walks and big photo viewpoints, plus the included snacks and bottled water in a comfortable, air-conditioned car. The main catch: some spots are brief (and Coit Tower has a $10 admission fee), so it’s not a slow, linger-all-day kind of day.
Key highlights in this layover tour
- SFO curbside pickup at your terminal, with a driver waiting and ready to move
- Golden Gate Bridge Welcome Center for quick exhibits and a close-up bridge moment
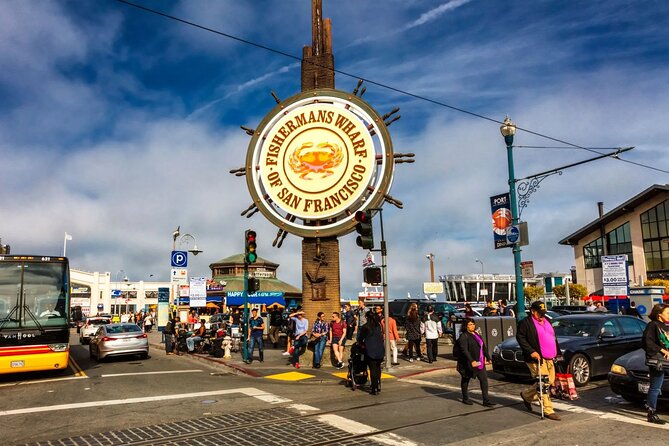
- Fisherman’s Wharf stop with time for pier views and a sea lion sighting
- Short photo stops for Lombard Street and Chinatown, so you still see a lot
- Coit Tower viewpoint time (budget the $10 entry)
- Alamo Square Painted Ladies for a classic skyline framed photo
In This Review
- A Layover-Friendly Route Built Around Time, Not Traffic
- Price and Value: What $289 for Up to 4 Really Buys You
- SFO Pickup and Drop-Off: The Part You Want to Be Easy
- Golden Gate Bridge Welcome Center: Close-Ups and Quick Context in 15 Minutes
- Fisherman’s Wharf in 20 Minutes: Pier Walk, Sea Lions, and Bay Views
- Lombard Street From the Car and Chinatown From the Road: Two Icon Stops, Little Time
- Coit Tower Overlook and Murals: Skyline Views Plus a Story Stop
- Alamo Square Painted Ladies: The Classic Photo in 10 Minutes
- Comfort Matters: Snacks, Water, and a Private Ride That Keeps You Focused
- What the Driver Experience Feels Like on a Short Layover
- Who Should Book This (and Who Might Want Something Else)
- Should You Book This Express San Francisco Layover Tour?
- FAQ
- How long is the San Francisco layover tour?
- Where will the driver meet me at SFO?
- Is the tour private?
- What is included in the price?
- Do I have to pay for Coit Tower?
- What happens if weather is poor?
A Layover-Friendly Route Built Around Time, Not Traffic
When your schedule is tight, you don’t need more information. You need a plan that respects minutes. This tour is designed for a 3 to 3 hours 15 minutes window, with stop lengths that feel realistic even if you’re hopping off an airplane and trying to stay awake.
The route is a straightforward sweep: bridge area, waterfront, a couple of signature drive-bys, then viewpoints and photo classics. The timing matters because you’re not adding transit overhead. You’re getting a car to the next best viewpoint while you keep your walking to short, manageable bursts.
One more thing: this experience depends on good weather. If weather gets rough, you should expect it to be rescheduled or refunded—so check the forecast when your day is close.
Price and Value: What $289 for Up to 4 Really Buys You
The price is $289 per group (up to 4), which is one of the biggest reasons this can feel like good value for a layover day. If you’re traveling solo, it’s still a simple way to see key highlights without thinking too hard about logistics. If you’re in a small group, it can stretch the budget further than piecemeal taxis plus individual entry fees plus parking hassles.
Here’s what you’re getting for that fixed price:
- Private transportation (so you’re not sharing a van with strangers or waiting on other pickups)
- Air-conditioned vehicle
- Snacks and bottled water
- A tightly planned itinerary that includes several free stops
The only add-on mentioned is Coit Tower admission ($10). Everything else on the listed stops is free where noted. That means you can plan your day without surprises, beyond that one ticket.
I’d call it a value play if your real cost is time. If you’ve got a short layover, the “pay to save minutes” logic is what makes this work.
You can also read our reviews of more tours and experiences in San Francisco
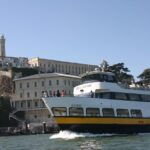
SFO Pickup and Drop-Off: The Part You Want to Be Easy
Let’s be honest: the hard part of any layover tour is the start. This one tries to remove friction with a clear meeting setup at San Francisco International Airport (SFO).
You’re picked up directly at SFO, at your terminal’s curbside pickup area. The driver will wait with a sign showing your name, and you just have to share your arrival details—flight number and expected arrival time—so they can track changes and adjust the pickup timing.
This matters more than it sounds. If you’ve landed and you’re dealing with baggage claim and a long walk to curbside, a smooth meet-up helps you avoid the stress spiral. The plan here is basically: you arrive, you spot the sign, you go.
The tour also includes drop-off back at the airport, which is the other half of saving time and energy at the end of your visit.
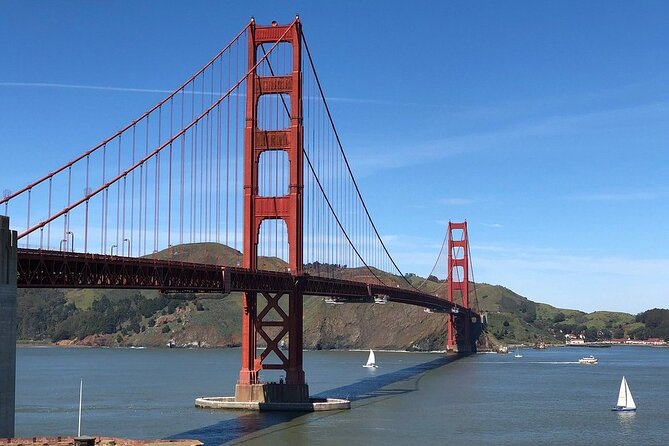
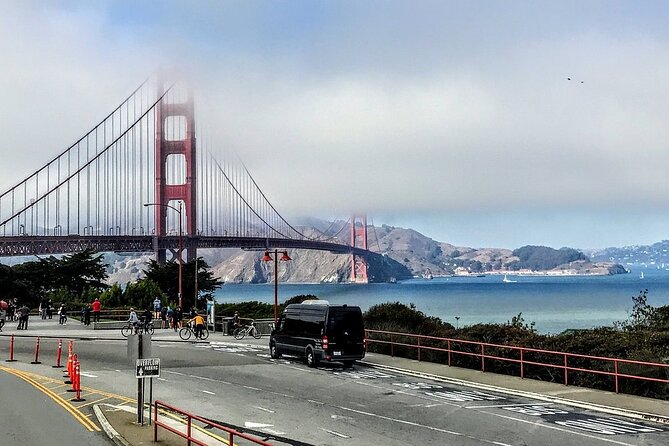
Golden Gate Bridge Welcome Center: Close-Ups and Quick Context in 15 Minutes
Your first stop is the Golden Gate Bridge Welcome Center, and it’s a smart choice for a layover day. You get a close-up view of the bridge, which is the whole point of visiting, without having to plan a long walk or commit to a bigger outing.
You’ll also find exhibits focused on the bridge’s construction. That’s useful even for short visits, because it gives the iconic bridge some real grounding—so you’re not just looking at a famous structure, you’re understanding why it’s so famous.
There’s time for a gift shop too, which can be a nice bonus if you want a practical souvenir without hunting later.
Timing tip: with only about 15 minutes, I’d treat this stop as two priorities: get your photos early, then spend the remaining minutes with the exhibits. If you flip that order, crowds and weather can squeeze your best shots.
Potential drawback: the time is short. If you want to linger for deep reading in the exhibits, this stop may feel rushed.
Fisherman’s Wharf in 20 Minutes: Pier Walk, Sea Lions, and Bay Views
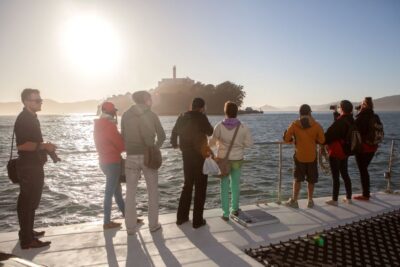
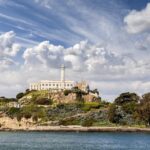
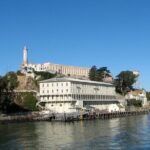
Next up is Fisherman’s Wharf, a waterfront area that’s famous for a reason. You’ll have around 20 minutes to stroll along the pier, look for sea lions, and enjoy views that include Alcatraz and the bay.
That combo is ideal for a layover: it gives you variety without requiring a long commitment. You get sights that are easy to understand right away (waterfront + pier + skyline/harbor views) plus a bit of real life in the form of those sea lions.
You can also browse unique shops in the area. With short time, keep shopping light—think “browse and pick one thing,” not “shop until you’re done.”
Timing tip: if you care about photos, position yourself first for the bay view, then do the walking afterward. You don’t want to spend 20 minutes moving around only to find the best angle after your time is almost gone.
Potential drawback: 20 minutes disappears fast at a busy waterfront. If you’re the type who hates feeling rushed, you may feel the clock here.
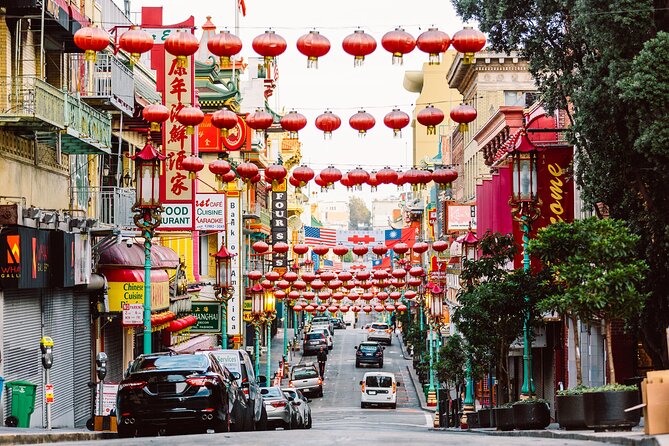
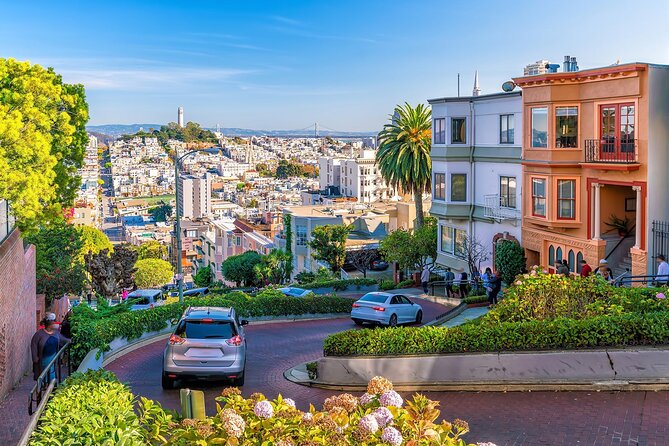
Lombard Street From the Car and Chinatown From the Road: Two Icon Stops, Little Time
This is where the itinerary makes a very layover-smart compromise: you get the highlights, but not deep time.
First, you’ll get a glimpse of the crookedest street in the world, Lombard Street. The plan is a drive-by of the famous one-block stretch with gardens lining the road. If it’s possible, there’s a brief chance for a quick photo from the car.
Then you’ll pass through Chinatown, with a short look at the streets and architecture. You’ll see the Dragon Gate, plus colorful shops, lanterns, and authentic Chinese architecture as you drive through.
Why this works: Chinatown and Lombard Street can eat time if you let them. Parking, walking, and deciding what to do can stretch a half-hour into an hour. Here, you get a quick signature snapshot in exchange for keeping the schedule intact.
Potential drawback: because these are quick looks from the road, you won’t have time to wander far into either area. If your dream is to explore Chinatown on foot, this tour is more about recognition than immersion.


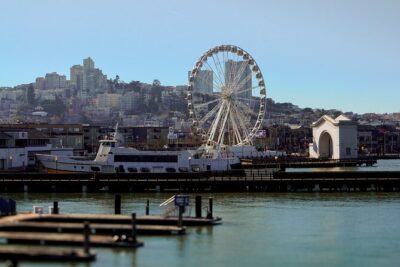
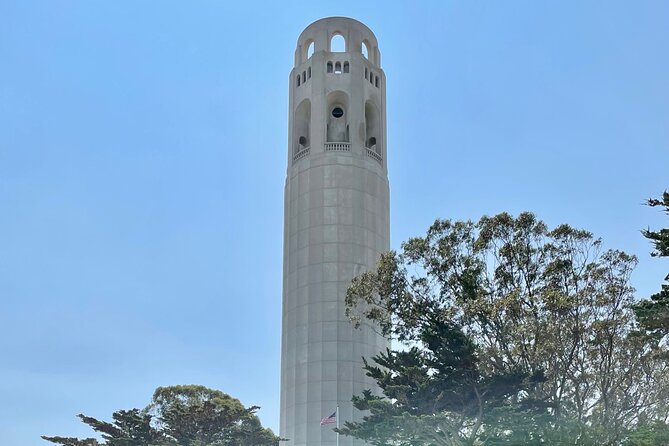
Coit Tower Overlook and Murals: Skyline Views Plus a Story Stop
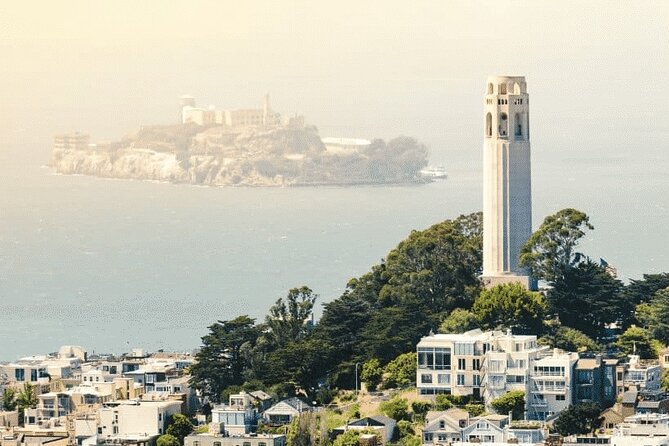
At Coit Tower you get around 15 minutes, and it’s timed as a payoff moment: a higher vantage point after the waterfront and street passes.
From here, you’ll get sweeping views of the San Francisco skyline and bay. There’s also time for a quick panorama, plus the chance to see the surrounding murals. These murals tell stories about the city’s past, which adds meaning to the scenery.
This stop is valuable because it flips the perspective. You’ve been low and close to landmarks so far. Now you’re seeing the city in one sweep.
Timing tip: if you want both photos and murals, do photos first, then spend your remaining minutes with the murals. Trying to read and photograph at the same time can eat time when the group is moving.
Important note: Coit Tower admission is not included and costs $10. Budget for that so you’re not surprised when you arrive.
Potential drawback: if you want a lot of time inside the tower area, 15 minutes might feel tight. This is a see-it-and-enjoy-it stop, not a long visit.
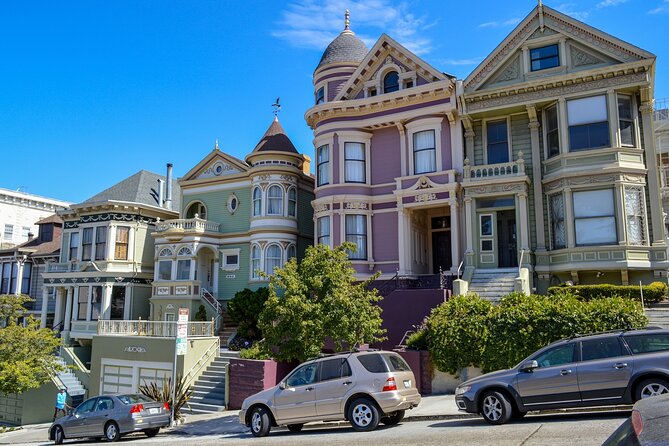
Alamo Square Painted Ladies: The Classic Photo in 10 Minutes
Your final sightseeing highlight is Alamo Square to see the Painted Ladies—a row of colorful Victorian houses framed against the skyline. This is one of those San Francisco scenes that looks good from one good spot, which is exactly why it fits a layover schedule.
You’ll have about 10 minutes, so think photo-first. The houses are visually bold, and the skyline framing is what makes it so recognizable. The stop is also described as a peaceful moment, which matters when you’ve been moving fast for hours.
Timing tip: use the car drop to orient yourself quickly. Take photos early, then do a short pause just to take it in. At this point, you don’t want to chase extra shots and end up without time for the classic view.
Potential drawback: with only 10 minutes, there’s little flexibility for detours. Come ready to move.
Comfort Matters: Snacks, Water, and a Private Ride That Keeps You Focused
The itinerary is tight, but the ride supports it. You get an air-conditioned vehicle, plus snacks and bottled water. That sounds like small stuff until you’re on a layover and you’ve got limited energy.
I like the private setup too. Because it’s your group only, you don’t waste time waiting on other people’s walking pace or last-minute decisions. The driver also helps with keeping the schedule moving between stops—especially important when you’re doing multiple areas in a short window.
Practical advice for your day
- Bring a light layer. Even if it’s warm outside, vehicles can run cool.
- Keep your phone charged for photos and for tracking your timing.
- Wear shoes that can handle short walks quickly, including pier surfaces and viewpoints.
What the Driver Experience Feels Like on a Short Layover
Even with limited time, the driver piece is often what makes or breaks layovers. The feedback on this experience highlights strong communication ahead of time and smooth handling once you arrive. That matches the goal: reduce stress at pickup, then get you to the right sights fast.
Comfort also comes up. A comfortable car matters on a short day because you’ll feel every minute you’re stuck in traffic or sitting cramped. Here, the car is set up to keep the day manageable.
One more detail worth noting: the plan includes time to actually wander and explore a bit at key stops, not just drive past everything. That’s why the Golden Gate Welcome Center and Fisherman’s Wharf stops feel more satisfying than a pure look-from-the-window tour.
Who Should Book This (and Who Might Want Something Else)
This is a great match if you:
- Have a short layover and want SF highlights without transit planning
- Prefer a private experience for up to four people
- Like short, efficient walking stops paired with viewpoint time
- Want an airport pickup and drop-off that keeps the day structured
It might not be your best fit if you:
- Want to spend a long time inside museums or walking neighborhoods on foot
- Really care about spending deep time in Chinatown or on Lombard Street itself
- Dislike paying add-on fees like the $10 Coit Tower admission
The other big factor is weather. Since it requires good weather, it’s smart to think of this as a best-case sightseeing plan for your layover day.
Should You Book This Express San Francisco Layover Tour?
If you’re trying to squeeze San Francisco into a connection day, I think this one is an easy recommendation. The logic is sound: airport pickup that meets you curbside, a fixed route that hits major landmarks, and several free stops so you can keep costs predictable.
Book it if your priority is getting your bearings fast and seeing iconic scenes in a structured way. If you’re hoping for long, slow exploration in neighborhoods, you may find the short stop times limiting.
One final practical note: it’s often booked about 37 days in advance, so if your dates are firm, don’t wait too long to lock in a spot.
FAQ
How long is the San Francisco layover tour?
It runs about 3 hours to 3 hours 15 minutes.
Where will the driver meet me at SFO?
You’ll meet the driver directly at SFO at your terminal’s curbside pickup area. You’ll need to provide your flight number and expected arrival time so they can adjust pickup timing, and the driver will be waiting with a sign with your name.
Is the tour private?
Yes. It’s a private tour/activity, and only your group participates. The group size is up to 4.
What is included in the price?
The price includes snacks, bottled water, an air-conditioned vehicle, and private transportation. A mobile ticket is also offered.
Do I have to pay for Coit Tower?
Yes. Coit Tower admission is not included and costs $10.
What happens if weather is poor?
This experience requires good weather. If it’s canceled due to poor weather, you’ll be offered a different date or a full refund.